The group I'll be painting consists of three Armiger Warglaives, and one each of the Knight Paladin/Errant, and the Knight Warden/Gallant/Crusader. All of the kits are magnetized to allow any configuration.
One of the reasons I've been putting off painting these awesome figures is indecision over color & heraldry. I wasn't sure if I wanted to make all of them different colors / FreeBlades, or if they should be one Questoris House with a unified color scheme. In the end I chose House Griffith. The White/Navy Blue/Red/Gold color scheme was very regal and bold in appearance, and the primarily off-white / cream color would make for a nice challenge. Example of finished House Griffith Questoris Knights:

After building, magnetizing, and priming all of the kits in polyurethane black, it was on to the airbrush for base colors.
The whole happy family :


I find it's usually best to start coloring with the deepest area and work your way out, finally ending up at the highest/most lighted areas (inside-to-out, bottom-to-top). So the first base colors would be the bare mechanical bits behind the armor plating. For this I chose to do two passes. Chainmail silver over black provided most of the colorization, with built-in shading from generally pointing the airbrush downwards.

Chainmail Silver over all of the bare metal mechanical bitz:


The second pass was the much brighter Steel color, in which I used sparingly over the large, exposed metal bits as a first highlight. This process was fast and smooth, not worrying too much about overspray or details, knowing that a later black oil wash will bring all of the shading together later anyway. For large flat areas (like the chainblade below) the Steel highlight is easier to see.


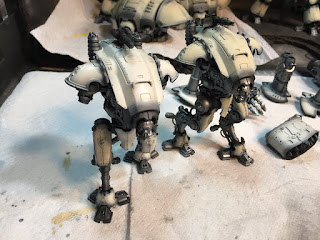
All finished with the metal. This took about 30 minute for all 5 models and their various arms.


The second color choice to airbrush would be the large off-white areas of armor plating. This also required two passes, but with more precision than the metallics above. On the models, most of the armor plating areas have a nice thick gilded area that acts as a border around armor plating areas. This gave me a useful buffer zone for the airbrush for minor overspray, again avoiding the need for any masking at this point (to me, speed is of the essence at this stage!).

Starting off dark and building up to the lighter areas, the first color choice was Bone White. Using the Renegade Krome at 15-20psi with the Extra Fine tip at various small choke widths as the area required. Laying down a foundation of the Bone color, while leaving a slight shaded gradient area around the gilded border. This was the most thorough/slow step, as the Bone White needs a few layers to appropriately cover the black primer. It took roughly 1 hour to complete.


The last color choice for this WIP stage was the white armor. For this I used Dead White, putting on thin layers over the Bone white to build up the shading. There are only a few areas that are pure Dead White, most of the layering allows some color through to provide a natural looking gradient.
Here's a comparison of Armiger Warglaives, one with the Dead White highlights, one without. The difference looks subtle in the photo but more striking in person:

And the finished product for this stage:


All total it took about 2.5 hours to complete this stage, including mixing colors & clearing jams (it was a hot day in the garage).
With a couple of exceptions, the rest of the figures details will be painted with a brush. Thanks for looking!
Looks great. I've got a whole Ad Mech army (plus knights) to paint and this is really good info. I'm just now learning how to use my airbrush. Any tips and tricks, please share. :)
ReplyDeleteThanks for looking, and welcome to airbrushing. I hope you find that the airbrush takes your painting to another level, not only in terms of finished product quality but also (maybe even more importantly) in the massive amounts of time you will save!
DeleteLove the way your saving so much time batch painting these knights mate.
ReplyDeleteThis comment has been removed by a blog administrator.
ReplyDelete