The Knights' huge shoulder pauldrons play a big role in giving the knight its' color profile and heraldric identity. With House Griffith, each shoulder (and some leg armor plates) are split into two colors, see the overhead illustration below:

So in this step, we will be coloring some of the armor plates either red or blue using the airbrush, since one of the major benefits of the airbrush is its ability to smoothly paint large surface areas. As we've already laid down the two major base colors in cream and steel in Part I, we'll need to use masking in order to protect those colors from any overspray.
For masking, I'm using Silly Putty.
Silly putty is great for masking off general areas that do not need to much edge precision. If you were masking off a pattern, tape would be the way to go; but for speed and general overspray protection, silly putty works perfectly, especially on these armor plates which have the large buffer zone that we've yet to paint.
Note: in case you are considering using Blue Tac like products for masking, DON'T DO IT. It only takes one disaster experience for the Blue Tac to remove the paint you were trying to protect for you to never touch the stuff again; it's not worth the risk.
Note #2: Some may point out that you won't need to mask much if you paint the armor while it's still on the sprue. I don't disagree with that, but if you're anything like me, I like to fully assemble models before painting them. It's not practical for me to keep the models in a box until I am able to paint them, I'm too eager to see them built and on the table. But if it works better for you painting on the sprue, go for it!
Time: 90 - 120 minutes. It took me closer to two hours for the whole process below, but I did pause for photos and beer.
Here we're masking off the shoulder plates to be colored red. The only precise area to mask is the straight line that separates the two halves of the armor plate. For this, use a hobby knife to fit the putty into the groove:


You just want to make sure that a) the putty is not covering anywhere you want to paint, and b) the putty is covering anywhere that you want to protect from overspray. You don't need to go too crazy with it, as you're just looking to protect roughly 1/2" around the area you'll paint, and obviously if there's nothing at risk, don't worry about masking it (such as the outside edge of the pauldron).
While it'd be ideal to do all of your masking on all of your models before starting any painting, I only had enough silly putty to do the Knights first, and then the Armigers second. Looks like I need to place another order for a pack of 6 'eggs' of silly putty from Amazon.
I chose to give each knight a slightly different armor pattern. One of the Knights is going to have a red hood and additional red thigh armor; the other will not:


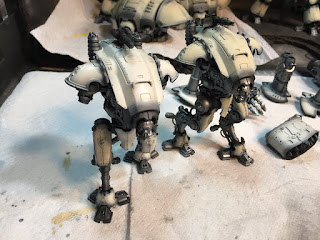
Here are the masked Armigers (skipping ahead after the Knights had been done, to re-use the putty):

After the masking is ready, do a once over mimicking your painting angles, to double check if there's any areas you might have missed that are potential overspray issues. Once you're satisfied, it's time to paint. For the red armor areas, I'm using a base coat of Khorne Red followed up with Evil Sunz Scarlet, and a final highlight with Trollslayer Orange.

I use paints from many different ranges; I think that some manufacturers make better paints in certain colors than others. For example, GW's reds are some of the best out there. Red is a notoriously thin paint, but GW's formula gives them better coverage than other lines. Use what you prefer.
The first coat is Khorne red. Working over white especially, this requires several coats to get full coverage. Your first coat should be extra thin - a 'tack' coat - and fully dry before applying additional coats. The first coat will not appear anything close to the color red in your bottle, probably some grotesque pink - but resist the urge to spray on more paint now, as that will only lead to trouble with bubbling and dripping. A full Khorne Red took about 5-6 quick coats on each area. With several models ready to go, and a dry time of about 20 seconds, this phase moves pretty quickly.
After the Khorne red is applied, drop some Evil Sunz Scarlet into the airbrush. This time concentrate on the top, most-lit area of the piece, and work down with thin layers. This creates a seamless gradient between Scarlet and Khorne red working top to bottom. These scarlet coats require less coverage and are a bit faster since you are not covering up any white or black primer. At this point you should have a fairly pure scarlet red color at the top of the area, and a pure Khorne Red only towards the bottom/edge of the armor area; everything in between is a gradual mix.
Repeat this procedure using a bit of scarlet/Trollslayer Orange on the top portion of the armor area only; a few coats should do to provide the highlights. Here are the results:


Note: As you can see above, I prefer a more subtle, natural highlight gradient. However, you can go as 'dramatic' as you want; some internet examples of airbrush shading really turn it up a notch on every separate piece of armor. That's not to my taste but it may work fine for you. In which case use an even darker base color and even brighter highlight gradient color ( a'spotlight' appearance) with several more coats of pure Trollslayer Orange .
Here;s a side by side between Khorne Red basecoat (still a bit wet in the photo) and the finished pauldron with Scarlet and Orange applied lightly:


After the reds are completely finished, remove the masking:


On the armored areas that are split into two sections, don't worry about the groove in between at this point - you can see they are half-filled in the pics above and don't look 'straight'. Those are going to be covered with a black wash later on and don't need to spend time on these now.
With the reds done, we move on to blue. Following the exact same procedure above with the reds. The blue process will be for a single pauldron half only, meaning we need to mask the freshly painted red half. Perhaps there is an official drying period, but I had no issues re-masking after about fifteen minutes.
I couldn't find a reliable paint color guide anywhere online for House Griffith, and I didn't have anything close enough in my existing bottles, so I decided to eyeball it and mix my own blue. This will be a combination of GW Shadow Grey (a blue-grey) and Vallejo's Ultramarine Blue. Final highlights worked up into Electric Blue and white.


Here are the results:


And the colored armor sections are done!
For my tastes, the blue color appears a bit too bright for what I want the final colors to look like. However, I know that the shading process later on will dull the colors down to my liking. It is much easier to start with a bright color and make it dull, vs. starting with a dull color and trying to make it brighter.
Lastly, here's an example of some overspray getting through, thanks to the putty moving during the painting process. Make sure to apply firm enough pressure throughout the mask:

Whoops! that will have to be cleaned up with a bit of white.
Thanks for reading


