Showing posts with label Empire of the Blazing Sun. Show all posts
Thursday, June 11, 2015
Amphibious Landing Craft for Upcoming Volcano Base Assault!
Labels:
1/1200,
Airbrush,
Badger,
Battleship,
Carrier,
DW,
Dystopian Wars,
Dystopian Wars Scenery,
Empire of the Blazing Sun,
EotBS,
Games Workshop,
Prussian Empire,
Scenery,
Tutorial,
Vallejo Model Air
Wednesday, June 3, 2015
Dystopian Wars Scenery - Doctor Evil Mad Scientist Island of Doom Secret Volcano Base
I know it has been some time since I updated; things have been busy, and I simply haven't made much time for the hobby, which includes photographing and updating.
One of my friends/Dystopian Wars group member finally got an airbrush and can now experience the fun of using it first-hand, and the project he decided to dip into was a secret island base, with volcano and all.
Here are some WIP shots:
One of my friends/Dystopian Wars group member finally got an airbrush and can now experience the fun of using it first-hand, and the project he decided to dip into was a secret island base, with volcano and all.
Here are some WIP shots:
And finally, the completed work:
Can't wait to see it in action; seems like it could be a cool campaign piece for an evil Prussian scientist or perhaps something involving Antarcticans!
Labels:
1/1200,
Airbrush,
Badger,
Carrier,
coolminiornot,
DW,
Dystopian Wars,
Dystopian Wars Scenery,
Empire of the Blazing Sun,
EotBS,
Prussian Empire,
Scenery,
Spartan Games,
Tutorial,
Uncharted Seas,
Wargaming
Friday, April 25, 2014
Dystopian Wars — Operation: Coos Bay
Here's the scenery we have for out two-day, combination 7500 point battle; a Normandy-style invasion.
Labels:
DW,
Dystopian Wars,
Dystopian Wars Scenery,
Empire of the Blazing Sun,
EotBS,
Gunship,
Naval Battles,
Scenery,
Terrain,
Uncharted Seas
Tuesday, July 2, 2013
Dystopian Wars - Campaign 2013
It's been a while, and while I have been busy with modeling and painting, I simply haven't had the time to do the uploading and tutorial process. I've been fastidiously recording all my progress on current projects, but have been waylaid by something fun — a Dystopian Wars campaign!
We did quite a bit of DW last year, and it seems like a summer game for a lot of us. We can enjoy Sundays while gaming and drinking Blood Marys.
Here are some pics from our inaugural game: Loot the Lusitania!
We did quite a bit of DW last year, and it seems like a summer game for a lot of us. We can enjoy Sundays while gaming and drinking Blood Marys.
Here are some pics from our inaugural game: Loot the Lusitania!
We were running two games, side-by-side, on 4'x4's. It was myself (EBS) vs FSA, and PE vs. China. Above is the deployment of the latter game.
We had only one Lusitania (Olympia?) model at the "clubhouse", so we used a Prussian Battleship for our Lusitania. It had 4AA and 9AP, and the goal was to prize it for 300 campaign points. Small items could be picked up for 50+(d6x10) campaign points, simply by moving your ship to an all stop and getting them or swinging by them and picking them up on the d6 roll of a 4, 5, or 6.
The PE vs. China game was very close, but the Chinese edged them out for the victory. My game was a little more one-sided; in addition to prizing the Lusitania and grabbing five tokens, I completely obliterated my opponent's forces. The FSA player is really fun to play with, and one of my favorite people to game with, and I think we both really enjoyed ourselves.
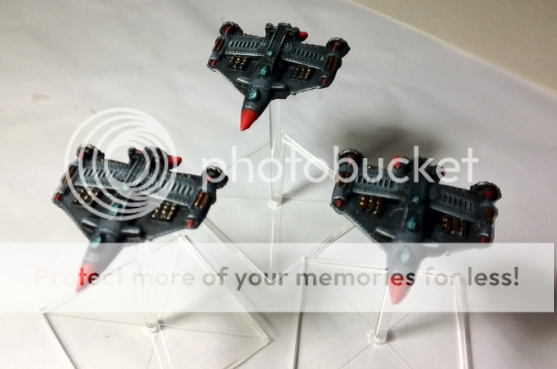
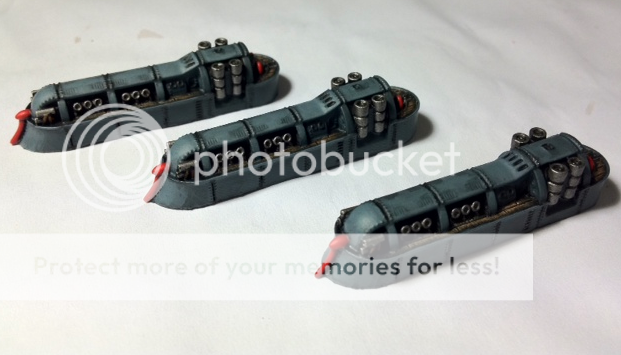
Also, I quickly airbrushed up my land forces for the EBS, using a Mediterranean Blue (VMA) and Terran Khaki (RMS), and I think the scheme looks good. Here are some samples, and I will post more once they're completely done.
Labels:
Battleship,
DW,
Dystopian Wars,
Dystopian Wars Scenery,
Empire of the Blazing Sun,
EotBS,
islands,
Japan,
Naval Battles,
Prussian Empire,
Spartan Games,
Vallejo Model Air
Thursday, July 5, 2012
Dreadnaught: Work in Progress
Labels:
1/1200,
Battleship,
Carrier,
coolminiornot,
Cruiser,
DW,
Dystopian Wars,
Empire of the Blazing Sun,
EotBS,
Games Workshop,
Japan,
Monster,
Naval Battles,
p3 paints,
Portland,
RMS,
RMS HD
Sunday, July 1, 2012
Empire of the Blazing Sun Carrier
Some updates: My carrier for a battle today.


Labels:
coolminiornot,
DW,
Dystopian Wars,
Empire of the Blazing Sun,
EotBS,
Japan,
Naval Battles,
p3 paints,
reaper master series,
RMS,
RMS HD,
Spartan Games
Monday, June 25, 2012
More Scenery (Beach Invasion)
More added, for an "Normandy"-style game we'd like to play:


Labels:
DW,
Dystopian Wars,
Empire of the Blazing Sun,
EotBS,
Naval Battles,
Prussian Empire,
Scenery,
Spartan Games,
Uncharted Seas,
Wargaming
Wednesday, June 20, 2012
Dystopian Wars scratch-built scenery
Labels:
1/1200,
coolminiornot,
DW,
Dystopian Wars,
Empire of the Blazing Sun,
EotBS,
islands,
Naval Battles,
Prussian Empire,
Scenery,
Spartan Games,
Uncharted Seas,
Wargaming
Wednesday, May 30, 2012
Painting my Empire of the Blazing Sun Fleet
A post from the Spartan Community Forums, wherein I was asked about my mixture for the IJN color.
Thanks for asking; actually, I have received some PMs to this accord, as well, so I might as well put together a little bit about how I got that blue-grey.
One thing to note is that, initially, I looked for the blue-grey in stores, and most lines didn't have anything I liked: It was either too light or too dark, or too blue or too grey. Polly S has an IJN Blue-Grey, but to be honest, it's far too thin.
So, as mentioned in my other thread, I attempted to create something from scratch, but wanted it close to a historical IJN grey-blue. I mixed a RMS HD Ash Grey and RMS HD Military Grey in equal parts, and added a couple of drops of P3 Blue Ink (about 1 part ink to 50 parts paint — but mainly, I'd start with one drop, shake, and if it didn't look well, I'd another, ad nauseum, until desired consistency and opacity). To cleanly apply paint it should be thin enough that it would almost run off the brush, and the brush should be half-unloaded (onto a shirt, or towel), before use. The HD work great for this.

These are the paints I used to achieve this particular effect. The RMS HD are the best paints on the market for general use, because the pigment is high-density — it can be thinned and covers in a layer or two.
I ran out on my first run, meaning that half my fleet is painted with the first batch and half with the second; luckily, I was able to match them really close, so it's not even really that apparent. Furthermore, all units were painted with one pot or the other, to maintain consistency in case that the final product was not as consistent as I had hoped (but it was, luckily!)
Second batch (left) and first batch (right):

Paints are thinned on a wet pallet. While parchment paper works fine, I'm a real fan of the P3 papers (even though their paints are generally not-so-hot). I simply bought the paper, and passed on the $20 case, opting for a resealable plastic container, available at any supermarket for 1/50th of the price.

It's important to note, too, that paints (and especially at this still) will become just a saturated, lighter version of themselves, so in order to light for highlights (painted on) and final highlights (light drybrushing), I lighten with this:

Additionally, while I do thin with water (and it's the majority of what's in the wet pallet), I also use different recipes, contingent on how much time I need for wet blending on the mini. From the left, water, 1:1:5 mix of flow improver:drying retardant:water, with the right being the same, albeit mixed 1:1:10.

The RMS HD Ash Grey works great for those grey units (useful in any aerial Japanese "historical" navy), and for highlights, the Military Grey color works great; I thought about using this for my IJN Blue-Grey, but opted for the darker grey, instead. It is, however, the main color of my aerial forces.

Where the magic happens:

And finally, my current project. It's coming along quite well:

If you've checked my blog (located in my signature), you'll see what most of what I have been painting the last 20 years is 28/32mm. I think a change of perspective and painting-style is needed to paint 1/600 or 1/1200 scale, so that's something I am working on everyday.
Labels:
coolminiornot,
Dystopian Wars,
Empire of the Blazing Sun,
EotBS,
Japan,
p3 paints,
reaper master series,
RMS,
RMS HD,
Spartan Games
Tuesday, May 29, 2012
Even more Dystopian Wars . . .
Labels:
Battleship,
Dystopian Wars,
Empire of the Blazing Sun,
EotBS,
Gunship,
Japan,
Spartan Games,
Tanuki,
Tetsubo
Subscribe to:
Posts (Atom)